Job for apache2.service failed because the control process exited with error code.
https://askubuntu.com/questions/1013261/job-for-apache2-service-failed-because-the-control-process-exited-with-error-cod

- 1. Overview of the program:
- 1.1 Introduction and Logistics
- 1.2 Purpose of the Course
- 1.3 Learning Environment
- 1.4 Participants Expectations
- 2. Web Apps In DHIS2
- 2.1 DHIS2 Overview
- 2.2 Why do we need extensibility?
- 2.3 How to achieve extensibility?
- 2.4 DHIS2 Architecture
- 2.5 DHIS2 Web API and Example
- 2.6 DHIS2 Web Apps and Example
- 2.7 DHIS2 Data Store and Why Data Store?
- 2.8 DHIS2 Publish Subscribe Message Queue (SMQ) and Why publish (SMQ)?
- 2.9 DHIS2 App Store
- 2.10 Engaging with App Store
- 2.11 DHIS2 Software Development
- 2.12 DHIS2 Security
- 3. Overview of Web API
- 3.1 Session Agenda
- 3.2 Why DHIS2 Web API
- 3.3 HTTP and REST Principle
- 3.4 DHIS2 Authentication
- 3.5 Endpoint Overview
- 3.6 Schema Endpoint
- 3.7 Object Filtering
- 3.8 Field Filtering
- 3.9 References
- 4. Assignment
ERROR 2002 (HY000): Can’t connect to local MySQL server through socket ‘/var/run/mysqld/mysqld.sock’ (2)
https://stackoverflow.com/questions/11657829/error-2002-hy000-cant-connect-to-local-mysql-server-through-socket-var-run

https://stackoverflow.com/questions/21944936/error-1045-28000-access-denied-for-user-rootlocalhost-using-password-y
- 1. Overview of the program:
- 1.1 Introduction and Logistics
- 1.2 Purpose of the Course
- 1.3 Learning Environment
- 1.4 Participants Expectations
- 2. Web Apps In DHIS2
- 2.1 DHIS2 Overview
- 2.2 Why do we need extensibility?
- 2.3 How to achieve extensibility?
- 2.4 DHIS2 Architecture
- 2.5 DHIS2 Web API and Example
- 2.6 DHIS2 Web Apps and Example
- 2.7 DHIS2 Data Store and Why Data Store?
- 2.8 DHIS2 Publish Subscribe Message Queue (SMQ) and Why publish (SMQ)?
- 2.9 DHIS2 App Store
- 2.10 Engaging with App Store
- 2.11 DHIS2 Software Development
- 2.12 DHIS2 Security
- 3. Overview of Web API
- 3.1 Session Agenda
- 3.2 Why DHIS2 Web API
- 3.3 HTTP and REST Principle
- 3.4 DHIS2 Authentication
- 3.5 Endpoint Overview
- 3.6 Schema Endpoint
- 3.7 Object Filtering
- 3.8 Field Filtering
- 3.9 References
- 4. Assignment
curl Install on Ubuntu
sudo apt update
sudo apt upgrade
sudo apt install curl


Ref: https://www.cyberciti.biz/faq/how-to-install-curl-command-on-a-ubuntu-linux/
- 1. Overview of the program:
- 1.1 Introduction and Logistics
- 1.2 Purpose of the Course
- 1.3 Learning Environment
- 1.4 Participants Expectations
- 2. Web Apps In DHIS2
- 2.1 DHIS2 Overview
- 2.2 Why do we need extensibility?
- 2.3 How to achieve extensibility?
- 2.4 DHIS2 Architecture
- 2.5 DHIS2 Web API and Example
- 2.6 DHIS2 Web Apps and Example
- 2.7 DHIS2 Data Store and Why Data Store?
- 2.8 DHIS2 Publish Subscribe Message Queue (SMQ) and Why publish (SMQ)?
- 2.9 DHIS2 App Store
- 2.10 Engaging with App Store
- 2.11 DHIS2 Software Development
- 2.12 DHIS2 Security
- 3. Overview of Web API
- 3.1 Session Agenda
- 3.2 Why DHIS2 Web API
- 3.3 HTTP and REST Principle
- 3.4 DHIS2 Authentication
- 3.5 Endpoint Overview
- 3.6 Schema Endpoint
- 3.7 Object Filtering
- 3.8 Field Filtering
- 3.9 References
- 4. Assignment
PHP install on Mac
brew install php

Path not found: https://stackoverflow.com/questions/65487249/getting-a-warning-when-installing-homebrew-on-macos-big-sur-m1-chip
- 1. Overview of the program:
- 1.1 Introduction and Logistics
- 1.2 Purpose of the Course
- 1.3 Learning Environment
- 1.4 Participants Expectations
- 2. Web Apps In DHIS2
- 2.1 DHIS2 Overview
- 2.2 Why do we need extensibility?
- 2.3 How to achieve extensibility?
- 2.4 DHIS2 Architecture
- 2.5 DHIS2 Web API and Example
- 2.6 DHIS2 Web Apps and Example
- 2.7 DHIS2 Data Store and Why Data Store?
- 2.8 DHIS2 Publish Subscribe Message Queue (SMQ) and Why publish (SMQ)?
- 2.9 DHIS2 App Store
- 2.10 Engaging with App Store
- 2.11 DHIS2 Software Development
- 2.12 DHIS2 Security
- 3. Overview of Web API
- 3.1 Session Agenda
- 3.2 Why DHIS2 Web API
- 3.3 HTTP and REST Principle
- 3.4 DHIS2 Authentication
- 3.5 Endpoint Overview
- 3.6 Schema Endpoint
- 3.7 Object Filtering
- 3.8 Field Filtering
- 3.9 References
- 4. Assignment
Laravel Composer – error: Root composer.json requires phpoffice/phpword
sudo apt install php-xml will work but the thing is it will download the plugin for the latest PHP version.

If your PHP version is not the latest, then you can add version in it:

# PHP 7.1
sudo apt install php7.1-xml

# PHP 7.2:
sudo apt install php7.2-xml

# PHP 7.3
sudo apt install php7.3-xml


# PHP 7.4
sudo apt install php7.4-xml

# PHP 8
sudo apt install php-xml

Ref: https://stackoverflow.com/questions/43408604/php7-install-ext-dom-issue
- 1. Overview of the program:
- 1.1 Introduction and Logistics
- 1.2 Purpose of the Course
- 1.3 Learning Environment
- 1.4 Participants Expectations
- 2. Web Apps In DHIS2
- 2.1 DHIS2 Overview
- 2.2 Why do we need extensibility?
- 2.3 How to achieve extensibility?
- 2.4 DHIS2 Architecture
- 2.5 DHIS2 Web API and Example
- 2.6 DHIS2 Web Apps and Example
- 2.7 DHIS2 Data Store and Why Data Store?
- 2.8 DHIS2 Publish Subscribe Message Queue (SMQ) and Why publish (SMQ)?
- 2.9 DHIS2 App Store
- 2.10 Engaging with App Store
- 2.11 DHIS2 Software Development
- 2.12 DHIS2 Security
- 3. Overview of Web API
- 3.1 Session Agenda
- 3.2 Why DHIS2 Web API
- 3.3 HTTP and REST Principle
- 3.4 DHIS2 Authentication
- 3.5 Endpoint Overview
- 3.6 Schema Endpoint
- 3.7 Object Filtering
- 3.8 Field Filtering
- 3.9 References
- 4. Assignment
DHIS2: Delete trackedEntityInstances
https://your_server/api/trackedEntityInstances/CM1zLmk6qvA?strategy=DELETE

$href  = $request->get('href');

$url = $href."?strategy=DELETE";
$ch = curl_init();
curl_setopt($ch, CURLOPT_URL, $url);
curl_setopt( $ch, CURLOPT_HTTPHEADER, array('Content-Type:application/json'));
curl_setopt( $ch, CURLOPT_USERPWD, "user:pass");
curl_setopt($ch, CURLOPT_CUSTOMREQUEST, "DELETE");
$result = curl_exec($ch);
$httpCode = curl_getinfo($ch, CURLINFO_HTTP_CODE);
curl_close($ch);
- 1. Overview of the program:
- 1.1 Introduction and Logistics
- 1.2 Purpose of the Course
- 1.3 Learning Environment
- 1.4 Participants Expectations
- 2. Web Apps In DHIS2
- 2.1 DHIS2 Overview
- 2.2 Why do we need extensibility?
- 2.3 How to achieve extensibility?
- 2.4 DHIS2 Architecture
- 2.5 DHIS2 Web API and Example
- 2.6 DHIS2 Web Apps and Example
- 2.7 DHIS2 Data Store and Why Data Store?
- 2.8 DHIS2 Publish Subscribe Message Queue (SMQ) and Why publish (SMQ)?
- 2.9 DHIS2 App Store
- 2.10 Engaging with App Store
- 2.11 DHIS2 Software Development
- 2.12 DHIS2 Security
- 3. Overview of Web API
- 3.1 Session Agenda
- 3.2 Why DHIS2 Web API
- 3.3 HTTP and REST Principle
- 3.4 DHIS2 Authentication
- 3.5 Endpoint Overview
- 3.6 Schema Endpoint
- 3.7 Object Filtering
- 3.8 Field Filtering
- 3.9 References
- 4. Assignment
Unable to upload large DB in MySQL
max_allowed_packet=10000M
C:\xampp-7.4\mysql\bin\my.ini
- 1. Overview of the program:
- 1.1 Introduction and Logistics
- 1.2 Purpose of the Course
- 1.3 Learning Environment
- 1.4 Participants Expectations
- 2. Web Apps In DHIS2
- 2.1 DHIS2 Overview
- 2.2 Why do we need extensibility?
- 2.3 How to achieve extensibility?
- 2.4 DHIS2 Architecture
- 2.5 DHIS2 Web API and Example
- 2.6 DHIS2 Web Apps and Example
- 2.7 DHIS2 Data Store and Why Data Store?
- 2.8 DHIS2 Publish Subscribe Message Queue (SMQ) and Why publish (SMQ)?
- 2.9 DHIS2 App Store
- 2.10 Engaging with App Store
- 2.11 DHIS2 Software Development
- 2.12 DHIS2 Security
- 3. Overview of Web API
- 3.1 Session Agenda
- 3.2 Why DHIS2 Web API
- 3.3 HTTP and REST Principle
- 3.4 DHIS2 Authentication
- 3.5 Endpoint Overview
- 3.6 Schema Endpoint
- 3.7 Object Filtering
- 3.8 Field Filtering
- 3.9 References
- 4. Assignment
Laravel Exception: The stream or file could not be opened: failed to open stream: Permission denied
chmod -R 777 /var/www/html/storage
- 1. Overview of the program:
- 1.1 Introduction and Logistics
- 1.2 Purpose of the Course
- 1.3 Learning Environment
- 1.4 Participants Expectations
- 2. Web Apps In DHIS2
- 2.1 DHIS2 Overview
- 2.2 Why do we need extensibility?
- 2.3 How to achieve extensibility?
- 2.4 DHIS2 Architecture
- 2.5 DHIS2 Web API and Example
- 2.6 DHIS2 Web Apps and Example
- 2.7 DHIS2 Data Store and Why Data Store?
- 2.8 DHIS2 Publish Subscribe Message Queue (SMQ) and Why publish (SMQ)?
- 2.9 DHIS2 App Store
- 2.10 Engaging with App Store
- 2.11 DHIS2 Software Development
- 2.12 DHIS2 Security
- 3. Overview of Web API
- 3.1 Session Agenda
- 3.2 Why DHIS2 Web API
- 3.3 HTTP and REST Principle
- 3.4 DHIS2 Authentication
- 3.5 Endpoint Overview
- 3.6 Schema Endpoint
- 3.7 Object Filtering
- 3.8 Field Filtering
- 3.9 References
- 4. Assignment
Composer Install
sudo apt-get update
sudo apt-get install composer

Ref: https://howtoinstall.co/en/composer
- 1. Overview of the program:
- 1.1 Introduction and Logistics
- 1.2 Purpose of the Course
- 1.3 Learning Environment
- 1.4 Participants Expectations
- 2. Web Apps In DHIS2
- 2.1 DHIS2 Overview
- 2.2 Why do we need extensibility?
- 2.3 How to achieve extensibility?
- 2.4 DHIS2 Architecture
- 2.5 DHIS2 Web API and Example
- 2.6 DHIS2 Web Apps and Example
- 2.7 DHIS2 Data Store and Why Data Store?
- 2.8 DHIS2 Publish Subscribe Message Queue (SMQ) and Why publish (SMQ)?
- 2.9 DHIS2 App Store
- 2.10 Engaging with App Store
- 2.11 DHIS2 Software Development
- 2.12 DHIS2 Security
- 3. Overview of Web API
- 3.1 Session Agenda
- 3.2 Why DHIS2 Web API
- 3.3 HTTP and REST Principle
- 3.4 DHIS2 Authentication
- 3.5 Endpoint Overview
- 3.6 Schema Endpoint
- 3.7 Object Filtering
- 3.8 Field Filtering
- 3.9 References
- 4. Assignment
Uninstall composer
sudo apt-get remove composer

sudo apt-get remove --auto-remove composer

sudo apt-get purge composer

sudo apt-get purge --auto-remove composer


Reference: https://howtoinstall.co/en/composer?action=remove
- 1. Overview of the program:
- 1.1 Introduction and Logistics
- 1.2 Purpose of the Course
- 1.3 Learning Environment
- 1.4 Participants Expectations
- 2. Web Apps In DHIS2
- 2.1 DHIS2 Overview
- 2.2 Why do we need extensibility?
- 2.3 How to achieve extensibility?
- 2.4 DHIS2 Architecture
- 2.5 DHIS2 Web API and Example
- 2.6 DHIS2 Web Apps and Example
- 2.7 DHIS2 Data Store and Why Data Store?
- 2.8 DHIS2 Publish Subscribe Message Queue (SMQ) and Why publish (SMQ)?
- 2.9 DHIS2 App Store
- 2.10 Engaging with App Store
- 2.11 DHIS2 Software Development
- 2.12 DHIS2 Security
- 3. Overview of Web API
- 3.1 Session Agenda
- 3.2 Why DHIS2 Web API
- 3.3 HTTP and REST Principle
- 3.4 DHIS2 Authentication
- 3.5 Endpoint Overview
- 3.6 Schema Endpoint
- 3.7 Object Filtering
- 3.8 Field Filtering
- 3.9 References
- 4. Assignment
Job for apache2.service failed because the control process exited with error code.
https://askubuntu.com/questions/1013261/job-for-apache2-service-failed-because-the-control-process-exited-with-error-cod
ERROR 2002 (HY000): Can’t connect to local MySQL server through socket ‘/var/run/mysqld/mysqld.sock’ (2)
https://stackoverflow.com/questions/11657829/error-2002-hy000-cant-connect-to-local-mysql-server-through-socket-var-run

https://stackoverflow.com/questions/21944936/error-1045-28000-access-denied-for-user-rootlocalhost-using-password-y
MacOS: Composer install
php -r "copy('https://getcomposer.org/installer', 'composer-setup.php');"
php -r "if (hash_file('sha384', 'composer-setup.php') === '55ce33d7678c5a611085589f1f3ddf8b3c52d662cd01d4ba75c0ee0459970c2200a51f492d557530c71c15d8dba01eae') { echo 'Installer verified'; } else { echo 'Installer corrupt'; unlink('composer-setup.php'); } echo PHP_EOL;"
php composer-setup.php
php -r "unlink('composer-setup.php');"

https://getcomposer.org/download/
MacOS Terminal: Default Shell Bash selection
chsh -s /bin/bash
Send data to DHIS2 instance from R
library(httr)
library(readr)
library(assertthat)
library(jsonlite)
library(purrr)

baseurl<-"https://play.dhis2.org/2.38nightly/"
username<-"admin"
password<-"district"

loginDHIS2<-function(baseurl,username,password) {
  url<-paste0(baseurl,"api/me")
  r<-GET(url,authenticate(username,password))
  assert_that(r$status_code == 200L) }

loginDHIS2(baseurl,username,password)

# get dataset
dataSet<-"BfMAe6Itzgt"
period<-"202101"
ou<-"DiszpKrYNg8"

url<-paste0(baseurl,
            "api/dataValueSets.json?",
            "dataSet=", dataSet,
            "&period=",period,
            "&orgUnit=",ou)

output<-fromJSON(content(GET(url),type="text", encoding="UTF-8"))

# output
head(output$dataValues) #note that "dataValues" object is in tabular format with data

# now select and update a data value within output
purrr::pluck(output,"dataValues","value",1)<-103

# head(output$dataValues)
# double check its updated

#POST back to server

resp<-httr::POST(url,body=toJSON(output), content_type_json())

resp$status_code #check 200 response

Detail: https://community.dhis2.org/t/send-data-to-dhis2-instance-from-r/52665
Stacked Bar Using R
# Library
library(ggplot2)
library(openxlsx) #install.packages("openxlsx")
library(gridExtra)  #install.packages("gridExtra")

# File location
path <- "myfile.xlsx"

# Getting data from sheets
sheets <- openxlsx::getSheetNames(path)
data_frame <- lapply(sheets, openxlsx::read.xlsx, xlsxFile = path)

# Assigning names to data frame
names(data_frame) <- sheets
#data_frame

# Define variables for each country
Bangladesh <- as.data.frame(data_frame['bd'])
Nepal <- as.data.frame(data_frame['np'])
SriLanka <- as.data.frame(data_frame['sl'])
Bhutan <- as.data.frame(data_frame['bh'])
Laos <- as.data.frame(data_frame['ls'])
PNG <- as.data.frame(data_frame['pn'])
TL <- as.data.frame(data_frame['tl'])


# Bangladesh Stacked plot
bd_chart <- ggplot(Bangladesh, aes(x = bd.year, y = bd.value, fill = bd.type)) +
  ggtitle("Bangladesh") + xlab("Years") + ylab("Percentage of data volume (%)") +
  theme(legend.position="bottom", legend.title = element_blank()) + geom_col()

# Nepal Stacked plot
np_chart <- ggplot(Nepal, aes(x = np.year, y = np.value, fill = np.type)) +
  ggtitle("Nepal") + xlab("Years") + ylab("Percentage of data volume (%)") +
  theme(legend.position="bottom", legend.title = element_blank()) + geom_col()

# Sri Lanka Stacked plot
sl_chart <- ggplot(SriLanka, aes(x = sl.year, y = sl.value, fill = sl.type)) +
  ggtitle("Sri Lanka") + xlab("Years") + ylab("Percentage of data volume (%)") +
  theme(legend.position="bottom", legend.title = element_blank()) + geom_col()


# Bhutan Stacked plot
bht_chart <- ggplot(Bhutan, aes(x = bh.year, y = bh.value, fill = bh.type)) +
  ggtitle("Bhutan") + xlab("Years") + ylab("Percentage of data volume (%)") +
  theme(legend.position="bottom", legend.title = element_blank()) + geom_col()

# Laos Stacked plot
laos_chart <- ggplot(Laos, aes(x = ls.year, y = ls.value, fill = ls.type)) +
  ggtitle("Laos") + xlab("Years") + ylab("Percentage of data volume (%)") +
  theme(legend.position="bottom", legend.title = element_blank()) + geom_col()

# PNG Stacked plot
png_chart <- ggplot(PNG, aes(x = pn.year, y = pn.value, fill = pn.type)) +
  ggtitle("PNG") + xlab("Years") + ylab("Percentage of data volume (%)") +
  theme(legend.position="bottom", legend.title = element_blank()) + geom_col()

# TL Stacked plot
tl_chart <- ggplot(TL, aes(x = tl.year, y = tl.value, fill = tl.type)) +
  ggtitle("TL") + xlab("Years") + ylab("Percentage of data volume (%)") +
  theme(legend.position="bottom", legend.title = element_blank()) + geom_col()

grid.arrange(bd_chart, np_chart, sl_chart, bht_chart, laos_chart, png_chart, tl_chart, ncol= 4, nrow = 2)
AWS RDS: How to check max_connection and processlist
SELECT @@max_connections;

SHOW FULL PROCESSLIST
AWS RDS: How do I increase the max connections of my Amazon RDS for MySQL or Amazon RDS for PostgreSQL instance?
Step-1: Log into your account https://ap-south-1.console.aws.amazon.com/rds
Step-2: Click on databases >> Detail of the database >> Click on the networking
Step-3: Click on the first box under Instance >> DB instance parameter group >> Click on the default one
Step-4: Search 'max_connections' and click on the radio button and then edit it
Step-5: Replace the value box by: {DBInstanceClassMemory/125828}
Step-6: If it doesn't accept then create a new parameter group and add this value
Step-6: Now you need to back to the database detail panel and click on the 'Modify' option
Step-7: Scroll-down and see the option 'Database options' under 'Additional configuration'
Step-8: Select 'DB parameter group' and update it


More: https://repost.aws/knowledge-center/rds-mysql-max-connections
Apache: server reached MaxRequestWorkers setting, consider raising the MaxRequestWorkers setting
#nano /etc/apache2/mods-enabled/mpm_event.conf —————————–add—————————————-StartServers 2 MinSpareThreads 25 MaxSpareThreads 75 ThreadLimit 64 ThreadsPerChild 25 MaxRequestWorkers 625 MaxConnectionsPerChild 10 And ... mpm_prefork.confServerLimit 3000 StartServers 15 MinSpareServers 25 MaxSpareServers 25 MaxRequestWorkers 3000 MaxConnectionsPerChild 10 ——————————————————————- # service apache2 restart
DHIS2 Metadata: create program using API
GET: http://server/api/programs.json
Program details: http://server/api/programs/uid.json
Get TrackedEntityType UID: http://server/api/trackedEntityTypes

POST: http://server/api/programs
Program JSON Payload:
{

  "name": "mWater Interoperability",
  "shortName": "mWater",
  "displayIncidentDateLabel": "Incident Date",
  "enrollmentDateLabel": "Registration Date",
  "onlyEnrollOnce": false,
  "displayFormName": "mWater Interoperability",
  "displayEnrollmentDateLabel": "Registration Date",
  "selectIncidentDatesInFuture": false,
  "incidentDateLabel": "Incident Date",
  "selectEnrollmentDatesInFuture": false,
  "registration": true,
  "useFirstStageDuringRegistration": false,
  "displayName": "mWater Interoperability",
  "completeEventsExpiryDays": 0,
  "displayShortName": "mWater Interoperability",
  "externalAccess": false,
  "withoutRegistration": false,
  "featureType": "NONE",
  "displayFrontPageList": false,
  "programType": "WITH_REGISTRATION",
  "displayIncidentDate": true,
  "trackedEntityType": {
        "id": "Pjbv4UHlKDb"
    }
}
DHIS2 Metadata: Data element create API
GET: /server/api/dataElements.json?fields=aggregationType,domainType,categoryCombo,valueType,zeroIsSignificant,name,shortName&filter=domainType:eq:TRACKER&pageSize=1

POST: http://server/api/dataElements

{
    "name": "BCG given (0-11m)",
    "shortName": "bcg",
    "aggregationType": "SUM",
    "domainType": "AGGREGATE",
    "valueType": "NUMBER",
    "zeroIsSignificant": false,
    "categoryCombo": {
        "id": "bjDvmb4bfuf"
    }
}
or

{
    "name": "BCG given (0-11m) -Test",
    "shortName": "bcg-Test",
    "aggregationType": "SUM",
    "domainType": "AGGREGATE",
    "valueType": "NUMBER",
    "zeroIsSignificant": false
}

Response:
{
    "httpStatus": "Created",
    "httpStatusCode": 201,
    "status": "OK",
    "response": {
        "responseType": "ObjectReport",
        "errorReports": [],
        "uid": "v3vNs7OnJyR",
        "klass": "org.hisp.dhis.dataelement.DataElement"
    }
}
DHIS2: Adding and removing objects in a single request
Adding and removing objects in a single request
API: POST /api/categories/IDA/categoryOptions
JSON Payload:
{
    "additions": [
        {
            "id": "IDA"
        },
        {
            "id": "IDB"
        },
        {
            "id": "IDC"
        }
    ],
    "deletions": [
        {
            "id": "IDD"
        },
        {
            "id": "IDE"
        },
        {
            "id": "IDF"
        }
    ]
}

https://docs.dhis2.org/en/develop/using-the-api/dhis-core-version-master/metadata.html#webapi_metadata_crud
DHIS2: Creating event metadata Web API
Create constant:
API: http://server/api/constants
JSON Payload:
{
    "name": "PI",
    "value": "3.14159265359"
}

Response:
{
    "httpStatus": "Created",
    "httpStatusCode": 201,
    "status": "OK",
    "response": {
        "responseType": "ObjectReport",
        "errorReports": [],
        "uid": "uarMA1P99k1",
        "klass": "org.hisp.dhis.constant.Constant"
    }
}
Laravel: Eloquent get results grouped by days
DB::table('table')
 ->select(DB::raw('DATE(login_date) as date'), DB::raw('count(*) as total'))
 ->groupBy('date')
 ->get();
DHIS2: Tracked Entity Attribute – Automatically generate
ORG_UNIT_CODE(...) + "-" + CURRENT_DATE(yyyyww) + "-" + SEQUENTIAL(#####)
System property dhis2.home not set
curl Install on Ubuntu
sudo apt update
sudo apt upgrade
sudo apt install curl


Ref: https://www.cyberciti.biz/faq/how-to-install-curl-command-on-a-ubuntu-linux/
PHP install on Mac
brew install php

Path not found: https://stackoverflow.com/questions/65487249/getting-a-warning-when-installing-homebrew-on-macos-big-sur-m1-chip
Laravel Composer – error: Root composer.json requires phpoffice/phpword
sudo apt install php-xml will work but the thing is it will download the plugin for the latest PHP version.

If your PHP version is not the latest, then you can add version in it:

# PHP 7.1
sudo apt install php7.1-xml

# PHP 7.2:
sudo apt install php7.2-xml

# PHP 7.3
sudo apt install php7.3-xml


# PHP 7.4
sudo apt install php7.4-xml

# PHP 8
sudo apt install php-xml

Ref: https://stackoverflow.com/questions/43408604/php7-install-ext-dom-issue
DHIS2: Delete trackedEntityInstances
https://your_server/api/trackedEntityInstances/CM1zLmk6qvA?strategy=DELETE

$href  = $request->get('href');

$url = $href."?strategy=DELETE";
$ch = curl_init();
curl_setopt($ch, CURLOPT_URL, $url);
curl_setopt( $ch, CURLOPT_HTTPHEADER, array('Content-Type:application/json'));
curl_setopt( $ch, CURLOPT_USERPWD, "user:pass");
curl_setopt($ch, CURLOPT_CUSTOMREQUEST, "DELETE");
$result = curl_exec($ch);
$httpCode = curl_getinfo($ch, CURLINFO_HTTP_CODE);
curl_close($ch);
Unable to upload large DB in MySQL
max_allowed_packet=10000M
C:\xampp-7.4\mysql\bin\my.ini
Laravel Exception: The stream or file could not be opened: failed to open stream: Permission denied
chmod -R 777 /var/www/html/storage
Composer Install
sudo apt-get update
sudo apt-get install composer

Ref: https://howtoinstall.co/en/composer
Uninstall composer
sudo apt-get remove composer

sudo apt-get remove --auto-remove composer

sudo apt-get purge composer

sudo apt-get purge --auto-remove composer


Reference: https://howtoinstall.co/en/composer?action=remove
During inheritance of ArrayAccess: Uncaught ErrorException
Laravel version issue: https://bytexd.com/fix-laravel-return-type-of-illuminatesupportcollectionoffsetexistskey/
PHP Version Downgrade
php artisan --version

Install PHP: sudo apt install software-properties-common ca-certificates lsb-release apt-transport-https
LC_ALL=C.UTF-8 add-apt-repository ppa:ondrej/php
sudo apt update
apt install php7.4

Version check: update-alternatives --config php

Disable: sudo a2dismod php8.1
Enable: sudo a2enmod php7.4

service apache2 restart

Reference: https://bytexd.com/fix-laravel-return-type-of-illuminatesupportcollectionoffsetexistskey/
Laravel: Not Found The requested URL was not found on this server.
sudo nano /etc/apache2/apache2.conf Find the following code inside the editor:Options Indexes FollowSymLinks AllowOverride None Require all granted Change to: Options Indexes FollowSymLinks AllowOverride All Require all granted After that restart the Apache server via: sudo /etc/init.d/apache2 restart Alternative: Alternatively you could replace all the contents in your public/.htaccess file Options +FollowSymLinks -Indexes RewriteEngine On RewriteCond %{HTTP:Authorization} . RewriteRule .* - [E=HTTP_AUTHORIZATION:%{HTTP:Authorization}] RewriteCond %{REQUEST_FILENAME} !-d RewriteCond %{REQUEST_FILENAME} !-f RewriteRule ^ index.php [L]
PHPMyAdmin: ERROR 1819 (HY000) – Password does not satisfy the current policy requirements
Select 'abort'
sudo mysql -p
mysql> UNINSTALL COMPONENT "file://component_validate_password";
mysql> exit
sudo apt install phpmyadmin

Remove the plug-in:
UNINSTALL PLUGIN validate_password;
In the event of an error, use:
UNINSTALL COMPONENT 'file://component_validate_password';

Source: https://stackoverflow.com/questions/67543000/phpmyadmin-error-1819-hy000-password-does-not-satisfy-the-current-policy-re
-bash: /usr/bin/composer: No such file or directory
alias composer='/usr/local/bin/composer'
composer

apt install composer

mkdir /usr/local/bin/composer
Phpmyadmin Not Found
Create a link in /var/www like this:

sudo ln -s /usr/share/phpmyadmin /var/www/

Note: since 14.04 you may want to use /var/www/html/ instead of /var/www/

If that's not working for you, you need to include PHPMyAdmin inside apache configuration.

Open apache.conf using your favorite editor, mine is vim :)

sudo vim /etc/apache2/apache2.conf

Then add the following line:

Include /etc/phpmyadmin/apache.conf

Reference: https://askubuntu.com/questions/387062/how-to-solve-the-phpmyadmin-not-found-issue-after-upgrading-php-and-apache
Certbot: Unable to locate package python-certbot-apache
sudo apt install -y certbot python3-certbot-apache
PHP Divisio by Zero Handle
$percentage = round( (($countAST[0]->total * 100) / ($countTotal[0]->total ?: 1)), 2);
SQLSTATE[HY000] [2002] No connection could be made
SQLSTATE[HY000] [2002] No connection could be made because the target machine actively refused
Check .env and config/database.php
Generate CSR for SSL certificate
openssl req -newkey rsa:2048 -nodes -keyout my_domain.key -out my_domain.csr


Writing new private key to 'my_domain.key'
-----
You are about to be asked to enter information that will be incorporated
into your certificate request.
What you are about to enter is what is called a Distinguished Name or a DN.
There are quite a few fields but you can leave some blank
For some fields there will be a default value,
If you enter '.', the field will be left blank.
-----
Country Name (2 letter code) [AU]:BD
State or Province Name (full name) [Some-State]:your_city
Locality Name (eg, city) []:your_city
Organization Name (eg, company) [Internet Widgits Pty Ltd]:your_org_name
Organizational Unit Name (eg, section) []:your_org_dept_name
Common Name (e.g. server FQDN or YOUR name) []:my_domain.com
Email Address []:your_email

Please enter the following 'extra' attributes
to be sent with your certificate request
A challenge password []:strong_pass
An optional company name []:second_org_name
Laravel 419 | Page Expired issue
Step-1: Update the following method:
app/Http/Middleware/VerifyCsrfToken

class VerifyCsrfToken extends Middleware
{
    /**
     * The URIs that should be excluded from CSRF verification.
     *
     * @var array
     */
     public function handle($request, Closure $next)
    {
        if($request->route()->named('logout')) {
            if (auth()->check()) {
                auth()->logout();
            }

            return redirect('/');
        }

        return parent::handle($request, $next);
    }
}

2. Check @csrf in the login blade
3. Remove logout route from the web.php
4. Update the following controllers and replace 'auth' with 'guest'

a) Controllers\Auth\RegisterController

public function __construct()
    {
        $this->middleware('auth');
    }

b. Controllers\Auth\LoginController
Guideline to add Laravel Socialite
1. Run: composer require laravel/socialite

2. Go config >>

	2.1 Add the following line under the "providers": Laravel\Socialite\SocialiteServiceProvider::class,

	2.2 Add this line in aliases: 'Socialite' => Laravel\Socialite\Facades\Socialite::class,

3. Google Client ID:

	3.1 Login into the https://console.cloud.google.com/apis/dashboard panel
	3.2 Create auth client ID
	3.3 Add Redirect URL: http://domain/auth/google/callback


4. Add google_id:
	4.1 php artisan make:migration add_google_id_column
	4.2 Open the user migration file and add the following code: $table->string('google_id')->nullable();

	4.3 Run the migration script: php artisan migrate

5. Route add:
	5.1 Login page route
	Route::get('/', function () {
    return view('auth/login'); // redirect to my login page
	});

	5.2 Redirect to Google
	Route::get('/google/auth', [LoginController::class, 'redirectToGoogle']);

	5.3 Google call back
	Route::get('/google/auth/callback', [LoginController::class, 'handleGoogleCallback']);

6. Update LoginController

	6.1 Add these:
		use Socialite;
		use Auth;
		use Exception;

	6.2 Add two methods
	public function redirectToGoogle() {
        return Socialite::driver('google')->redirect();
    }

    public function handleGoogleCallback() {

        try {
            $user = Socialite::driver('google')->user();

            print_r($user); die();

        } catch (Exception $e) {

            return redirect('google/auth');

        }

    }

7. Open .env file add add your client_id and secreate

GOOGLE_CLIENT_ID=355389651781-c1v0lp6ioecust9iompf80gijrns.apps.googleusercontent.com
GOOGLE_CLIENT_SECRET=GOCSPX-0hnr83mOj2INsPEl652kj6bh3F
GOOGLE_REDIRECT=http://localhost/googleLogin/public/auth/google/callback

8. Open config >> services.php and add the following code
	'google' => [
        'client_id' => env('GOOGLE_CLIENT_ID'),
        'client_secret' => env('GOOGLE_CLIENT_SECRET'),
        'redirect' => env('GOOGLE_REDIRECT'),
    ]
Tracker: Failed to metadata

Solution: Add the following line to your Tomcat server.
C:\Program Files (x86)\Apache Software Foundation\Tomcat 9.0\conf\server.xml

Open the server.xml file and add the following line:

relaxedQueryChars="[,]"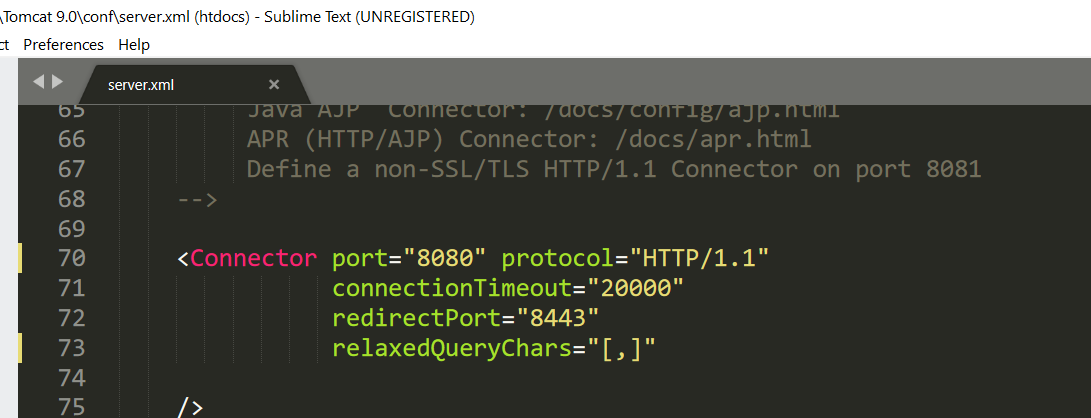
Phpmyadmin not found
https://www.digitalocean.com/community/tutorials/how-to-install-and-secure-phpmyadmin-on-ubuntu-18-04
Insufficient memory problem or OutOfMemoryError or GC overhead limit exceeded or java.lang.OutOfMemoryError: Java heap space or heap memory out of
Solution: Change the JAVA_OPTS from your Environment variable

JAVA_OPTS: -Xms7500m -Xmx7500m -XX:PermSize=2048m -XX:MaxPermSize=2048m
Forbidden. You don’t have permission to access this resource.
Visit: /etc/apache2/apache2.confOptions Indexes FollowSymLinks AllowOverride None Require all granted Source: https://stackoverflow.com/questions/60981999/forbidden-you-dont-have-permission-to-access-this-resource
Where are stored the files uploaded to DHIS2?
Apps and other files location: home/dhis/config/files
AWS configuration: https://docs.dhis2.org/master/en/implementer/html/install_file_store_configuration.html
Pivot table/ Chart/ Reports all say Organization units not found
1. Go to Maintenance then Organization Unit
2. Click on "Organization unit level"
3. Select the levels and save it
How to kill MySQL process?
1. Login using your root access to your server
2. Access mysql by:  mysql -u root -p and enter your password
3. mysql> show full processlist; You can see list of process
4. KILL id-number; and press enter
5. Restart Apache and MySQL:
service apache2 restart
service mysql restart
6. Reboot your server: sudo reboot
How to disable or read only DHIS2 Custom Data Entry Fields
Add the "disabled" attribute in the data element: disabled="disabled"

Example:

<-input disabled="disabled" id="hxZP6fofrgZ-dCWAvZ8hcrs-val" name="entryfield" title="Inj.Ampicillin2_ClosingBalance" value="[ Inj.Ampicillin2_ClosingBalance ]" -/>
TypeError: Cannot read property ‘path’ of undefined
Error: TypeError: Cannot read property 'path' of undefinedSolution: Go to Tracked entity type management and update the "Person" sharing settings.
Error Unsupported value type: COVID-19 cased-based surveillance
Error: Unsupported value type
Solution: it is known issue for tracker capture. The issue is with the assignment of the data elements to the program stage. You have to check the elements assignments section in program stages.
How to extract DHIS2 org units using PHP?
$ch = curl_init($this->serverIP."/organisationUnits/".$districtId.".json?fields=children[id,name,level,children[id,name,level,children[id,name,level]]]");
curl_setopt($ch, CURLOPT_RETURNTRANSFER,1);
curl_setopt($ch, CURLOPT_USERPWD, $this->auth);
curl_setopt($ch, CURLOPT_CUSTOMREQUEST, "GET");
curl_setopt($ch, CURLOPT_FOLLOWLOCATION, true);
curl_setopt($ch, CURLOPT_SSL_VERIFYPEER, false);
$status_code = curl_getinfo($ch, CURLINFO_HTTP_CODE); //get status code
$result=curl_exec ($ch);
curl_close ($ch);
$data = json_decode($result, true);
$tableData[] = array();
foreach ($data['children'] as $key => $value) {
$upazilaId = $value['id'];
$districtLevel = $value['level'];
if ($value['level'] == 4 && !empty($value['children'])) {
foreach ($value['children'] as $key => $levelFivevalue) {
// $upazilaId = $value['children'][$key]['id'];
$unionId = $levelFivevalue['id'];
if (!empty($levelFivevalue['children'])) {
foreach ($levelFivevalue['children'] as $key => $level6) {
$ccId = $level6['id'];
$ccName = $level6['name'];
if (stripos($level6['name'], "USC") !== false) {
$levelType = 'USC';
} else if($districtLevel == 3){
$levelType = 'CSO';
} else {
$levelType = 'CC';
}
$check = '';
$tableData[] = array( $check, $districtId, $upazilaId, $unionId, $levelType , $ccId, $ccName, 1);
}
}
}
}
}
echo json_encode($tableData);
How can I get organisation unit information in DHIS2 data entry form?
<--script type="text/javascript">

dhis2.util.on( 'dhis2.de.event.formReady', function( event,aLpVgfXiz0f) {

var orgName= $( '#selectedOrganisationUnit' ).val();// From DHIS2 Selection Param
jQuery.get("https://play.dhis2.org/2.31dev/api/organisationUnits.json?query="+orgName+"&fields=id,level",function(json){
	$.each(json, function(key, value){

		var arr = [];
		for(var x in value){
		arr.push(value[x]);
		}
		var level =value[x]['level'];
		if(typeof level != 'undefined'){
		 console.log({level});
		}


   });
  });
});

<--/script>
How to upload dhis2 backup database in ubuntu server?
How to upload dhis2 backup database in server?

1. Login into your root access in ubuntu server and create database:

sudo -u postgres createdb -O dhis amr2

2. Upload your backup database into your preferred location and run the below command:

sudo -u postgres psql amr2  < '/home/dhis/amr.sql'
// sudo -u postgres psql your_db_name  < 'your_file_location/your_db.sql'
DHIS2 event web api to update existing event
POST: http://your-server/api/events/

{
	"events": [{
		"program": "ywNJYaTUVRT",
		"orgUnit": "xDybhnrm1NW",
		"event": "nnjyTxUY39n",
		"eventDate": "2019-11-05",
		"status": "ACTIVE",
		"programStage": "HrdLXTOGh8A",
		"dataValues": [{
			"dataElement": "lIkk661BLpG",
			"value": "AMC94237"
		}, {
			"dataElement": "dRKIjwIDab4",
			"value": "Accident and Emergency"
		}, {
			"dataElement": "tQa6uU1t6s3",
			"value": "ICU"
		}]
	}, {
		"program": "ywNJYaTUVRT",
		"orgUnit": "xDybhnrm1NW",
		"event": "ElCfLd3JaGa",
		"eventDate": "2019-11-05",
		"status": "ACTIVE",
		"programStage": "HrdLXTOGh8A",
		"dataValues": [{
			"dataElement": "lIkk661BLpG",
			"value": "AMC46756"
		}, {
			"dataElement": "dRKIjwIDab4",
			"value": "Advance Trauma Centre"
		},{
			"dataElement": "LSIvZSvxTjw",
			"value": ""
		}]
	}]
}
Opening Balance calculation in DHIS2 stock management
<--script>
dhis2.util.on( 'dhis2.de.event.formReady', function( event,iReVg2xgFPL ) {
	  var periodN= $( '#selectedPeriodId' ).val();// From DHIS2 Selection Param
	  var nextPeriod=(+periodN) + (+1);//201611,201612,201613
	  var nextPeriodSeperate=periodN.toString().substring(0, 4);
	  var year=parseInt(nextPeriodSeperate.trim());
	  var month=parseInt(periodN % 100);
	  if(month==12){
	    year++;
		month=01;
		nextPeriod=year+'01';
		//console.log("Next period: "+nextPeriod);
	  }
	 $('.selectedDate').val(nextPeriod);
});

function closingBL(op,re,adplus,adminus,con,closingid,opnextId,period){
// All id pick
 var opbalance= new Number(document.getElementById(op).value);
 var receipts= new Number(document.getElementById(re).value);
 var adjustPlus= new Number(document.getElementById(adplus).value);
 var adjustMinus= new Number(document.getElementById(adminus).value);
 var consump= new Number(document.getElementById(con).value);
 var nextPeriod= $(period).val();
// Closing Balance text data set
var clobalance=opbalance+receipts+adjustPlus-adjustMinus-consump;
/*if(clobalance<0){
 alert('Closing Balance can not be newgative.');
 $(closingid).val(' ');
}*/
$(closingid).val(clobalance);// Display closing balance at the text field
$(opnextId).val(clobalance);// Display closing balance at the text field
$(closingid).change();
$(opnextId).change();
$(closingid).prop("readonly",true);
$(opnextId).prop("readonly",true);
// Spliting Element ID
var ArrayFromString = op.split("-");
var elementId=ArrayFromString[0];

//console.log('Element Id: '+elementId);
//console.log('nextPeriod Id: '+nextPeriod);
var valueSaver = new ValueSaver( elementId,nextPeriod, 'dCWAvZ8hcrs', clobalance, null, 'red' );
valueSaver.save();

}
<--/script>
DHIS2 bulk custom attribute json payload
if(typeof customAttributeString.optionSet !=='undefined' ){
  jsonPayload = JSON.stringify({
    "name": customAttributeString.name,
    "shortName": customAttributeString.shortName,
    "aggregationType": customAttributeString.aggregationType,
    "domainType": customAttributeString.domainType,
    "valueType": customAttributeString.valueType,
    "code": updateArray[i].value,
    "optionSet": {
          "id": customAttributeString.optionSet.id
      }
  });
}
else {
  jsonPayload = JSON.stringify({
    "name": customAttributeString.name,
    "shortName": customAttributeString.shortName,
    "aggregationType": customAttributeString.aggregationType,
    "domainType": customAttributeString.domainType,
    "valueType": customAttributeString.valueType,
    "code": updateArray[i].value
  });
}

let customAttributeString = response.data;
let jsonPayload = JSON.stringify({
...customAttributeString,
"code" : updateArray[i].value,
});
DHIS2 bulk custom elements json payload
jsonPayload = JSON.stringify({
    "name"      : customElementString.name,
    "shortName" : customElementString.shortName,
    "aggregationType": customElementString.aggregationType,
    "domainType": customElementString.domainType,
    "valueType" : customElementString.valueType,
    "code"      : updateArray[i].value,
    "displayName": customElementString.displayName,
    "displayShortName": customElementString.displayShortName,
    "displayFormName" : customElementString.displayFormName,
    "formName"        : customElementString.formName,
    "url"      : customElementString.url,
    "optionSet": {
        "id": customElementString.optionSet.id
    },
    "categoryCombo": {
        "id": customElementString.categoryCombo.id
    }
  });

Another way:

let customElementString = response.data;
let jsonPayload = JSON.stringify({
 ...customElementString
 code: updateArray[i].value
});
Smooth Interoperable DHIS2 Mechanisms Curb High Mortality Rates in Bangladesh
Bangladesh is making huge strides in curbing child mortality rates! The Bangladesh National Health Care System holds maternal, neonatal and child health (MNCH) as one of its biggest focuses. Between 1990 and 2015, the maternal mortality ratio (MMR) and under-5 mortality ratio (U5MR) in Bangladesh fell by an impressive 69.1% and 73% respectively reports ‘Trends in maternal mortality: Estimates by WHO, UNICEF, UNFPA, World Bank and the United Nations Populations Division’. DHIS2 is being used in tracking the availability and collecting data of priority MNCH medicines across different health facilities has played a crucial role in this impressive achievement. https://community.dhis2.org/t/smooth-interoperable-dhis2-mechanisms-curb-high-mortality-rates-in-bangladesh/37077
How to merge data elements and datastore payload using React JS
let self = this;
    await getPrograms().then((response) => {
      self.setState({
        dataElements : response.data.programs[0].programStages[0].programStageDataElements
      });
    }).catch(error => this.setState({error: true}));

    await getDataStoreNameSpace(this.props.orgUnitId).then((response) => {
      self.setState({
        dataStoreNamespace : response.data.elements
      });
    }).catch(error => this.setState({error: true}));

    // Merge two array
    const mergeById = (jsonPayload1, jsonPayload2) =>
    jsonPayload1.map(itm => ({
        ...jsonPayload2.find((item) => (item.id === itm.dataElement.id) && item),
        ...itm
    }));
    let mergedArray = mergeById(this.state.dataElements, this.state.dataStoreNamespace);
    this.setState({mergedArrayData: mergedArray});
Laravel database table migration
## Generate Migration

php artisan make:migration --path=database/migrations/modules/globalSettings create_admin_settings_table

### Migration Run Commands for table generate


php artisan migrate --path=database/migrations/modules/globalSettings
DHIS2 Login using Laravel and CURL
public function dhis2Login(Request $request) {

	$username = trim($request->input('username'));
	$password = trim($request->input('password'));
	$ch = curl_init("http://........:8080/api/me");
	curl_setopt($ch, CURLOPT_RETURNTRANSFER,1);
	curl_setopt($ch, CURLOPT_USERPWD, "admin:district");
	$status_code = curl_getinfo($ch, CURLINFO_HTTP_CODE);   //get status code
	$result=curl_exec ($ch);
	curl_close ($ch);
	$data['resultData']= json_decode($result, true);

}
How to calculate previous month value in DHIS2 data entry form?
dhis2.util.on( 'dhis2.de.event.formReady', function( event,iReVg2xgFPL ) {
      var periodN= $( '#selectedPeriodId' ).val();// From DHIS2 Selection Param
      var nextPeriod=(+periodN) + (+1);//201611,201612,201613
      var nextPeriodSeperate=periodN.toString().substring(0, 4);
      var year=parseInt(nextPeriodSeperate.trim());
      var month=parseInt(periodN % 100);
      if(month==12){
        year++;
        month=01;
        nextPeriod=year+'01';
      }
     $('.selectedDate').val(nextPeriod);
});
See detail: https://eportal.jaetech.co/?tutorial=how-to-calculate-previous-month-value-in-dhis2-data-entry-form
React JS Async await
if(this.state.duplicateStatus) {
  let dpRes = await ( async (payload, currentIndex) => {
  Object.entries(updateTeiJson).map(payload => {
    let trackedEntityInstance = payload[1].trackedEntityInstance;
    updateTrackedEntity(payload[1], trackedEntityInstance).then(responseData=>{
    console.log("responseData: ", responseData);
      this.setState({
         teiResponse: responseData.data,
         teiResponseString: JSON.stringify(responseData.data),
         duplicateStatus: false
      })
    });
  });
}
PostgreSQl-cannot execute nextval() in a read-only transaction
Issue: ERROR: cannot execute nextval() in a read-only transactionSolution: Go >> C:\Program Files\PostgreSQL\11\share, open postgresql.conf and replaced default_transaction_read_only to off as `default_transaction_read_only = off` Also here: C:\Program Files\PostgreSQL\11\data, open postgresql.conf and replaced default_transaction_read_only to off as `default_transaction_read_only = off` In command line: ALTER SYSTEM SET default_transaction_read_only = off; See the result: Select name, setting from pg_settings where name ='default_transation_read_only' --------------------------------------------------------------------- user=# SET SESSION CHARACTERISTICS AS TRANSACTION READ ONLY; SET user=# SHOW transaction_read_only; transaction_read_only ----------------------- on (1 row)
PostgreSQL could not open extension control file “C:/../share/extension/postgis.control”:
ERROR:  could not open extension control file "C:/Program Files/PostgreSQL/10/share/extension/postgis.control": No such file or directory

Actual Cause: If you installed postgres <= 10.1 and want to create postgis extension using `CREATE EXTENSION postgis`you may get this issue.

Solution:

It seems that the case is still the same with latest versions of postgres (PostgreSQL-9.6.3-1-win64-bigsql.exe) and postgis (postgis-bundle-pg96x64-setup-2.3.2-1.exe). I copied the files around until all the paths could be resolved:

    Everything from C:\PostgreSQL\pg96\share\extension to C:\PostgreSQL\pg96\share\postgresql\extension
    postgis_topology-2.3.dll, postgis-2.3.dll, rtpostgis-2.3.dll, address_standardizer-2.3.dll and ogr_fdw.dll from C:\PostgreSQL\pg96\lib to C:\PostgreSQL\pg96\lib\postgresql


Ref: https://stackoverflow.com/questions/42806784/how-to-alter-the-path-for-postgres-looking-for-extensions
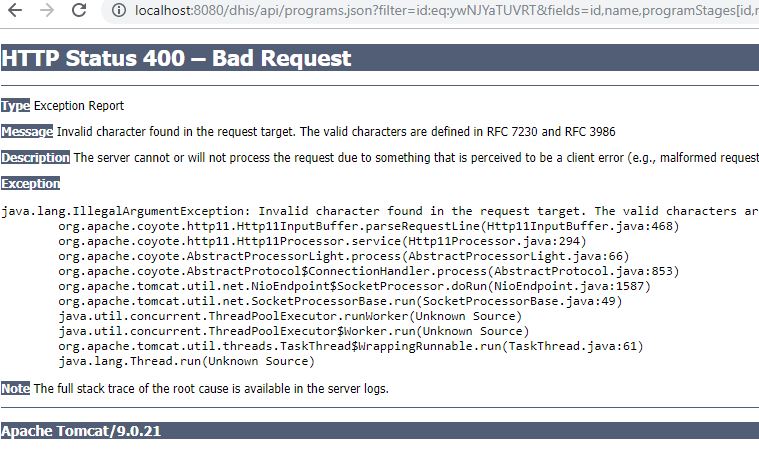
DHIS 2 web request gives “Invalid character found in the request target. The valid characters are defined in RFC 7230 and RFC 3986”
See detail: https://webmasters.stackexchange.com/questions/119129/dhis-2-web-request-gives-invalid-character-found-in-the-request-target-the-valSolution: This happens because DHIS 2 uses brackets in some of their URLs, and because Tomcat version 8.5 later has prohibited the use of brackets in URLs. The DHIS 2 team is working on a change in the API syntax to avoid the use of brackets, and to encode all API request URLs. A short-term fix is to configure Tomcat to allow for brackets through the relaxedQueryChars connector attribute. Open the following file: /tomcat-dir/conf/server.xml and add relaxedQueryChars="[]" to the HTTP connector element: <-Connector protocol="HTTP/1.1" port="8080" relaxedQueryChars="[]" -/>
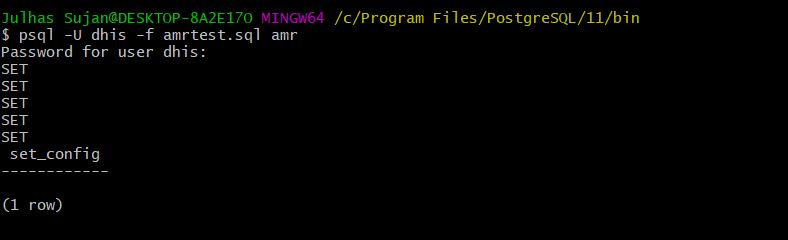
PostgreSQL database upload on windows
Go >> /c/Program Files/PostgreSQL/11/bin

Type: psql -U dhis -f dhis.sql dhis

Provide Password for user dhis: your dhis-password
Domain and Hosting Configuration in Digital Ocean
If you have purchased a domain from name.com/cheapname.com or any other website and want to host it in Digital ocean server, this post will guide you how to configure you domain and hosting in Digital Ocean. I have purchased a domain from ‘Exonhost’ and I want to host it in Digital Ocean Droplet. Let’s follow the below steps:
Read MoreHow to update categoryOptions using DHIS2 web api?
https://amrtest.icmr.org.in/amrtest/api/categoryOptions/v71U0ziiKTr
{
  "name": "Joint Fluid",
  "shortName": "JTFL",
  "attributeValues": [
    {
      "value": "Joint Fluid 3",
      "attribute": {
        "id": "xmp9h5eZldA"
      }
    }
  ]
}
Read More
How to update meta attributeValues (elements) using DHIS2 web api?
https://your-server/api/dataElements/2a19h5eZldA

{
	"name": "Hospital department",
	"shortName": "Hospital department",
	"aggregationType": "NONE",
	"domainType": "TRACKER",
	"valueType": "TEXT",
	"attributeValues": [{
		"value": "DEPARTMENT",
		"attribute": {
			"id": "xmp9h5eZldA"
		}
	}]
}
Read More
How to update specific trackedEntityAttributes using DHIS2 web api?
https://your-server/api/trackedEntityAttributes/DfXY7WHFzyc

{
      "name": "Age / DOB",
      "valueType": "AGE",
      "aggregationType": "AVERAGE",
      "shortName": "Age / DOB",
      "attributeValues": [
        {
          "value": "AGE",
          "attribute": {
            "id": "xmp9h5eZldA"
          }
        }
      ]
}
Read More
How to get elements detail using DHIS2 d2 framework
getInstance()
    .then(d2 => {
        d2.Api.getApi()
        .put('dataElements/lIkk661BLpG',{
            method: 'PATCH',
            headers: {
            'content-type': 'application/json',
            Authorization: "Basic " + btoa("admin:district")
            },
            data: '{"code": "AMR ID 111"}'
          })
        .then(response => {
           console.log("response: ",response);
        });
    });
Read More
Create New track entity through web API
Tracker Web API consists of 3 endpoints that have full CRUD (create, read, update, delete) support. The 3 endpoints are /api/trackedEntityInstances /api/enrollments and /api/events and they are responsible for Tracked entity instance, Enrollment and Event items.
http://your-server/api/trackedEntityInstances

{
    "trackedEntityType": "nEenWmSyUEp",
    "orgUnit": "DiszpKrYNg8",
    "attributes": [
      {
        "attribute": "w75KJ2mc4zz",
        "value": "Joe"
      }
    ],
    "enrollments":[
      {
         "orgUnit":"DiszpKrYNg8",
         "program":"ur1Edk5Oe2n",
         "enrollmentDate":"2017-09-15",
         "incidentDate":"2017-09-15",
         "events":[
            {
               "program":"ur1Edk5Oe2n",
               "orgUnit":"DiszpKrYNg8",
               "eventDate":"2017-10-17",
               "status":"COMPLETED",
               "storedBy":"admin",
               "programStage":"EPEcjy3FWmI",
               "coordinate":{
                  "latitude":"59.8",
                  "longitude":"10.9"
               },
               "dataValues":[
                  {
                     "dataElement":"qrur9Dvnyt5",
                     "value":"22"
                  }
               ]
            }

         ]
      }
   ]
}
Read More
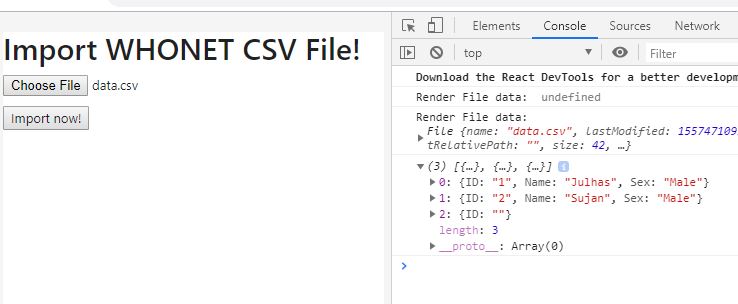
Parsing CSV file in React JS
Sometimes, you may need to upload CSV file using React JS. I have written here a script that can upload and parse CSV file data!
Read More
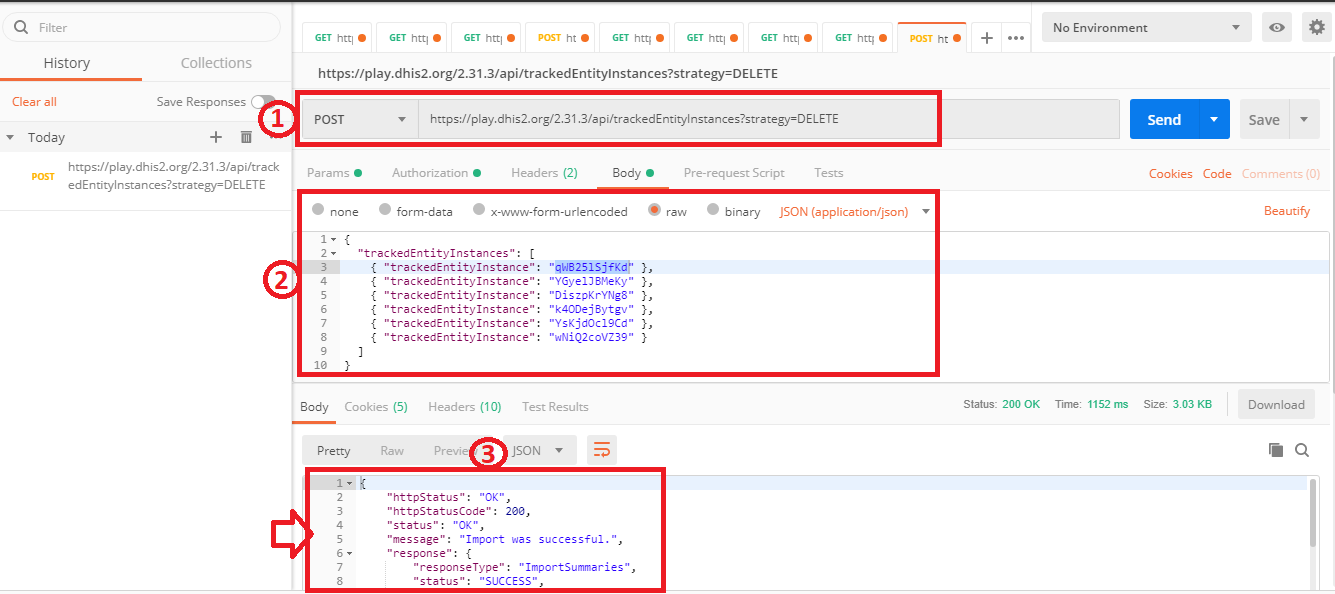
Deleting DHIS2 Tracker Records using WEB API
We can delete DHIS2 Tracked Entity Instances using postman as follows:
Read More
DHIS2 OAuth2.0 Authentication & Fetch Data
In this post, I will show you how to access DHIS2 data using OAuth2. Let’s start:
DHIS2 supports the OAuth2 authentication protocol. OAuth2 is an open standard for authorization which it allows third-party clients to connect on behalf of a DHIS2 user and get a reusable bearer token for subsequent requests to the Web API. DHIS 2 does not support fine-grained OAuth2 roles but rather provides applications access based on user roles of the DHIS2 user.
Each client for which you want to allow OAuth 2 authentication must be registered in DHIS2.
Read MoreDHIS2 installation in Amazon Elastic Compute Cloud (AWS-EC2) Server
Server specifications:
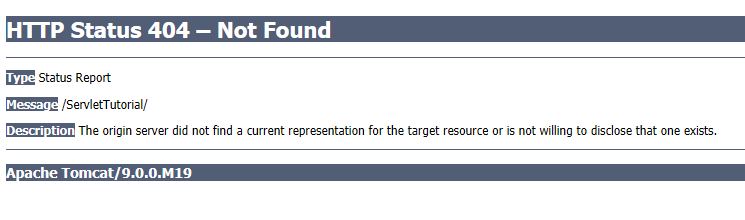
DHIS2 404-not found error
Problem Statement: DHIS2 404-not found error: After running tomcat
DHIS2 user create using web api
Sometimes, we face problem to create DHIS2 users using web api. In this post we will show you how to create users in DHIS2 using web api. See the below json payload:
{
  "id": "IE1zznX91pR",
  "firstName": "Julhas",
  "surname": "Sujan",
  "email": "julhaspustcse@gmail.com",
  "userCredentials": {
    "userInfo": { "id": "IE1zznX91pR" },
    "username": "julhas999",
    "password": "your-password",
    "userRoles": [ {
      "id": "mo3t1mDUOmy"
    } ]
  },
  "organisationUnits": [ {
    "id": "PFgkSbQ0nC0"
  } ],
  "userGroups": [ {
    "id": "L7advm7THNS"
  } ]
}
DHIS2 2.30 Failing to start & Java Heap Space Problem with Solution
Problem Statement: HTTP Status 500 – Handler dispatch failed; nested exception is java.lang.OutOfMemoryError: Java heap space

DHIS2 custom form scripting example for Stock calculation
In custom data entry form you can use JavaScript to create dynamic behavior and customizations. As an example, you can hide form sections based on specific user input for data elements, or show specific information when a form loads.
The DHIS2 data entry module provides a range of events which you can register for and use to perform actions at certain times. The events are registered on the document element. The jQuery event object and the data set identifier are always the first two arguments provided to the callback functions. The table below provides an overview of the events and when they are triggered.
DHIS2 Data Sets and Data Entry Forms
All data entry in DHIS2 is organized in data sets. A data set is a collection of data elements grouped together for data entry and data export between instances of DHIS2. To use a data set to collect data for a specific organization unit, you must assign the organization unit to the data set. Once you have assigned the data set to an organization unit, that data set is available in the Data entry app. Only the organization units that you have assigned the data set to can use the data set for data entry.
Read MoreDHIS2 core configuration and data management second round training materials
The purpose of this second-round training is to further tailoring of skills for national data management team on DHIS2 customization and maintenance. This training will emphasize on DHIS2 aggregated and tracker format customization along with standard in metadata management including naming convention. Process of metadata adding, updating, maintaining, sharing and archiving. User management and access control in DHIS2. The ultimate goal is to improve national capacity on data management and configuration of DHIS2.
Read More
ডাটা (Data), বিগ ডাটা (Big Data) ও মেটা ডাটা (Meta Data) ?
ধরুন আপনি ইলেকট্রনিক জাহাজে (Air Bus) করে বাংলাদেশ থেকে নরওয়ে তে যাচ্ছেন ডিএইচআইএস ২ র এক্সপার্ট একাডেমী তে জয়েন করার জন্য। একবার কি ভেবে দেখেছেন যে প্রতি সেকেন্ড এ বিমানে কি পরিমান তথ্যের (অনেক শ্রেণীবদ্ধ ডাটার সমন্বয়) প্রয়োজন হচ্ছে অথবা কি পরিমান তথ্য সে জমা করছে? অর্থাৎ ফ্লাইট ডাটা রেকর্ডার বা এফডিআর, যেটি বিমানের ওড়া, ওঠানামা, বিমানের মধ্যের তাপমাত্রা, পরিবেশ, চাপ বা তাপের পরিবর্তন, সময়, শব্দ ইত্যাদি নানা বিষয় নিজের সিস্টেমের মধ্যে রেকর্ড করে রাখে। আর যেখানে তথ্য গুলো জমা রাখে তাকে ‘ব্ল্যাক বক্স’বলে যা আমরা সবাই জানি। এটিকে ব্ল্যাক বক্স নামে ডাকা হলেও এর আসল নাম হলো ফ্লাইট রেকর্ডার আর এটির রং অনেকটা কমলা ধরণের। তাহলে আপনার নরওয়ে যেতে ১৫ ঘণ্টায় কি পরিমান তথ্য ফ্লাইট রেকর্ডারে জমা হবে? আসলে আমরা এই তথ্য গুলোকেই ডাটা বলছি।
বিস্তারিত দেখুনঃইন্ডিকেটর কি?
এটি অনেকটা ডাটা এলিমেন্ট এর মত যা ডাটা এনালাইসিস এর জন্য ব্যবহার করা। এটি একটি calculated formula যা ডাটা এলিমেন্ট, ক্যাটেগরি অপশন, দ্রুবক বা কোন ফ্যাক্টর এর সমন্বয়ে তৈরি। যেমন, আপনি ৫টি এলিমেন্ট এর ডাটার যোগফল পেতে চান সেক্ষেত্রে এই যোগফলটিই হচ্ছে ইন্ডিকেটর।
উধাহরন স্বরূপ BCG coverage <1 year বের করতে গেলে ফ্যাক্টর হিসাবে ১০০, numerator হিসাবে “BCG doses given to children under 1 year” এবং denominator হিসাবে “Target population under 1 year” ব্যবহার করতে হবে। নীচে কয়েকটি উধাহরন দেখানো হলঃ
বিস্তারিত দেখুনঃক্যাটেগরি, ক্যাটেগরি অপশন কি এবং কেন ব্যবহার করবেন?
একটি উদাহরণ এর মাধ্যমে বিষয়টি আলোচনা করা যাক। ধরুন কোন একটি এলাকায় কোন নিদিষ্ট সময় এর ম্যালেরিয়া রুগীর মোট সংখা কত তা দেখতে চান। সেক্ষেত্রে আপনি কি করবেন নিশ্চয় আপনি ডাটা এলিমেন্ট ব্যবহার করে ঐ সংখাটি নিয়ে আসবেন। তার মানে এখানে ডাটা এলিমেন্ট এর মাধ্যমে আপনি aggregate ডাটা নিয়ে আসলেন। এবার আপনি চান যে এই সংখার মধ্যে কত জন মহিলা এবং কত জন পুরুষ অথবা ১০ বৎসর এর বেশি অথবা ১০ বৎসর এর কমের কত রুগী আছে। সেই তথ্যটি কিন্তু আপনি ডাটা এলিমেন্ট থেকে পাবেন না। সেক্ষেত্রে আপনাকে ক্যাটেগরি ব্যবহার করতে হবে অর্থাৎ ক্যাটেগরি আসলে aggregate ডাটা এলিমেন্ট এর আলাদা কম্পনেন্ট। যেমন জেন্ডার অথবা এজ হচ্ছে ক্যাটেগরি আর মহিলা, পুরুষ এই গুলো হচ্ছে ক্যাটেগরি অপশন।
বিস্তারিত দেখুনঃডাটা এলিমেন্ট কি (What is data element) ?
ডিএইচআইএস ২ তে র-ডাটা ক্যাপচার করার মাধ্যম ই হল ডাটা এলিমেন্ট। ডেটা উপাদানগুলি কিভাবে সিস্টেমে রেকর্ড করা হয় ডাটা এলিমেন্ট সেটিই সংজ্ঞায়িত করে। যেমন ম্যালেরিয়ার ক্ষেত্রে মোট ম্যালেরিয়ার সংখ্যা কত তা ম্যালেরিয়া নামক একটি ডাটা এলিমেন্ট রেকর্ড কর। শুধু এতটুকু সংজ্ঞা দিয়ে ডিএইচআইএস ২ তে ডাটা এলিমেন্ট এর বিস্তৃতি বুঝা মুশকিল তবে কাজ করতে গেলে এটি সম্পর্কে বিস্তারিত জানা যাবে।
ডাটা এলিমেন্ট দেখা, ডাটা এলিমেন্ট এডিট করা, ডাটা এলিমেন্ট তৈরি করা, ডাটা এলিমেন্ট গ্রুপ তৈরি করা
বিস্তারিত দেখুনঃBlog
https://askubuntu.com/questions/1013261/job-for-apache2-service-failed-because-the-control-process-exited-with-error-cod
Blog
https://stackoverflow.com/questions/11657829/error-2002-hy000-cant-connect-to-local-mysql-server-through-socket-var-run

https://stackoverflow.com/questions/21944936/error-1045-28000-access-denied-for-user-rootlocalhost-using-password-y
Blog
php -r "copy('https://getcomposer.org/installer', 'composer-setup.php');"
php -r "if (hash_file('sha384', 'composer-setup.php') === '55ce33d7678c5a611085589f1f3ddf8b3c52d662cd01d4ba75c0ee0459970c2200a51f492d557530c71c15d8dba01eae') { echo 'Installer verified'; } else { echo 'Installer corrupt'; unlink('composer-setup.php'); } echo PHP_EOL;"
php composer-setup.php
php -r "unlink('composer-setup.php');"

https://getcomposer.org/download/
Home
https://askubuntu.com/questions/1013261/job-for-apache2-service-failed-because-the-control-process-exited-with-error-cod
Home
https://stackoverflow.com/questions/11657829/error-2002-hy000-cant-connect-to-local-mysql-server-through-socket-var-run

https://stackoverflow.com/questions/21944936/error-1045-28000-access-denied-for-user-rootlocalhost-using-password-y
Home
sudo apt update
sudo apt upgrade
sudo apt install curl


Ref: https://www.cyberciti.biz/faq/how-to-install-curl-command-on-a-ubuntu-linux/