Domain and Hosting Configuration in Digital Ocean
I have purchased a domain from ‘Exonhost’. I want to host it in Digital Ocean Droplet. Let’s follow the below steps:
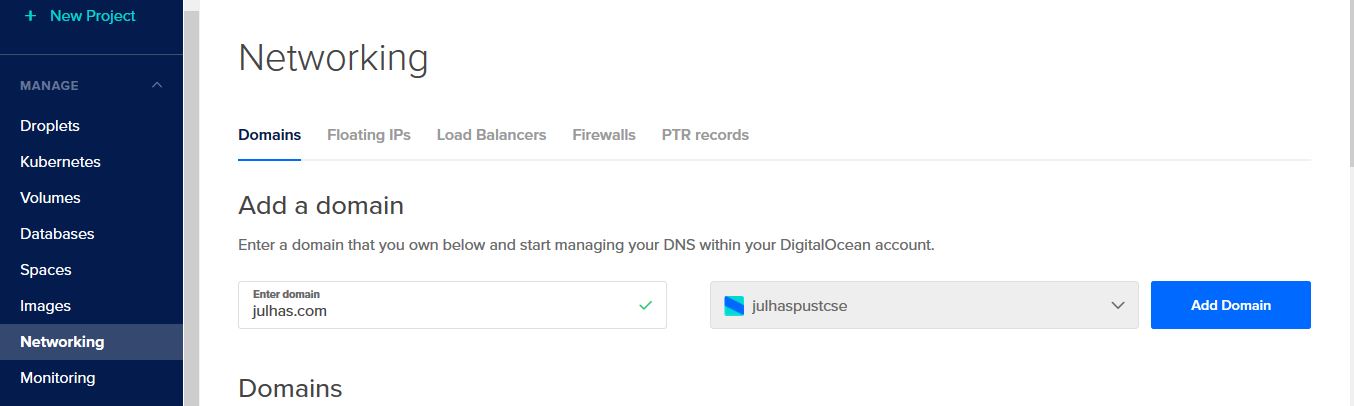
Step-1: Login to your digital ocean account. A. go to Manage from left sidebar >> click on Networking: Enter a domain that you own below and start managing your DNS within your DigitalOcean account.B. Click on the manage section from right side of your newly created domain:
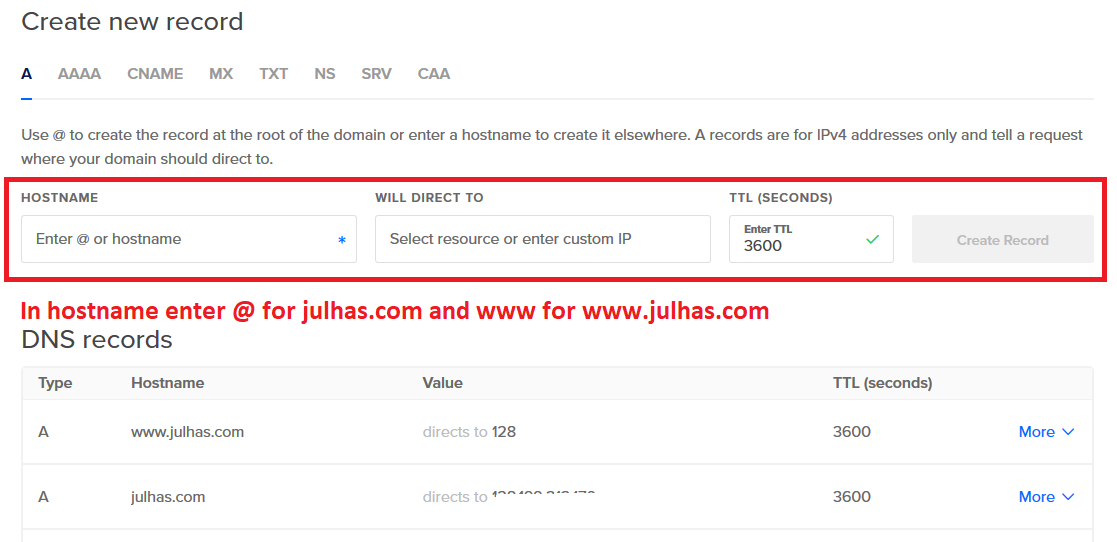
C. Add the below record:
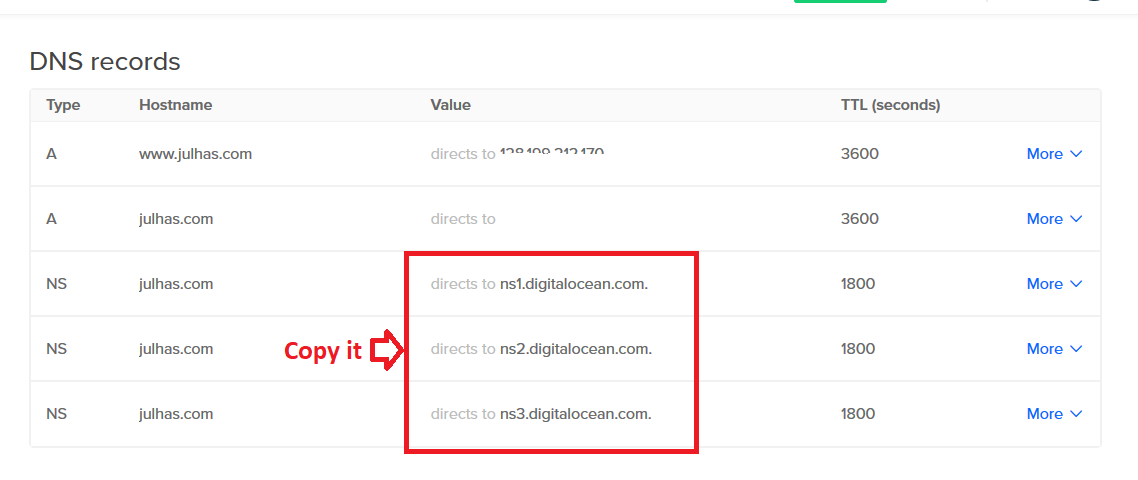
D. Copy the DNS and use it in the step-2:

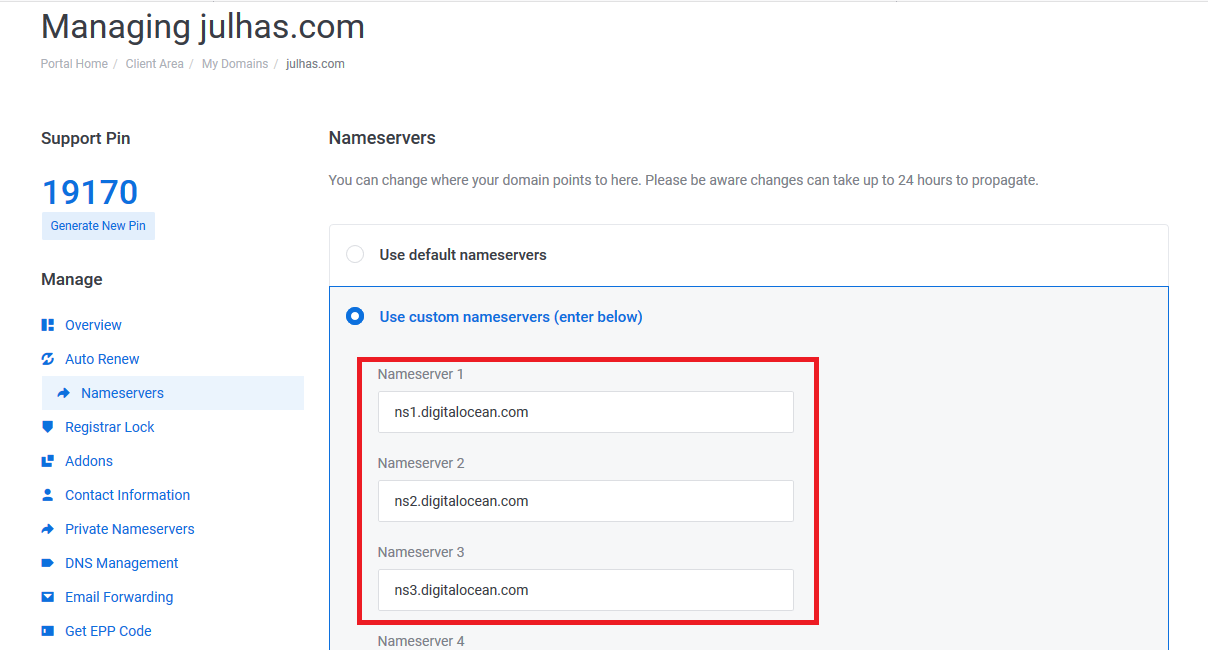
Step-2: Now login in your domain panel:
A.	Copy the DNS from your hosting and add as below:
Step-3: Open your terminal and login into your hosting server with root privilege.

A.	Go to sites-available directory using cd ‘/etc/apache2/sites-available’ command
Create a new file ‘touch 41-JULHAS.COM’ (I have added here 41 because in this hosting, we have 40 other sites)
B.	Now open this file and add the below code:
<-VirtualHost *:80>
       ServerAdmin webmaster@localhost
       ServerName www.julhas.com
       ServerAlias julhas.com
   DocumentRoot /var/www/html/ julhas.com /
     ErrorLog ${APACHE_LOG_DIR}/error-julhas.com.log
     <-Directory />
          Allowoverride All
          Require all granted
     <-/Directory>
      # Possible values include: debug, info, notice, warn, error, crit,
      # alert, emerg.
      LogLevel warn
       CustomLog ${APACHE_LOG_DIR}/access.log combined
<-/VirtualHost>

C.	Back from here and go  cd ‘sites-enabled’ directory
Type the below command: ln -s /etc/apache2/sites-available/41-JULHAS.COM 41-JULHAS.COM.conf
Step-04: Visit your root directory: /var/www/html
A.	Create a directory: julhas.com
B.	Upload all of your apps/software/website files
Step-05: Restart your server: `service apache2 restart`. Type your apps in browser and enjoy it!
Short way: sudo mkdir -p /var/www/dhis2trainingland.com sudo chown -R $root:$root /var/www/dhis2trainingland.com nano /var/www/dhis2trainingland.com/index.html sudo cp /etc/apache2/sites-available/000-default.conf /etc/apache2/sites-available/dhis2trainingland.com.conf sudo nano /etc/apache2/sites-available/dhis2trainingland.com.confServerAdmin admin@dhis2trainingland.com ServerName dhis2trainingland.com ServerAlias www.dhis2trainingland.com DocumentRoot /var/www/dhis2trainingland.com ErrorLog ${APACHE_LOG_DIR}/error.log CustomLog ${APACHE_LOG_DIR}/access.log combined RewriteEngine on RewriteCond %{SERVER_NAME} =www.dhis2trainingland.com [OR] RewriteCond %{SERVER_NAME} =dhis2trainingland.com RewriteRule ^ https://%{SERVER_NAME}%{REQUEST_URI} [END,NE,R=permanent] sudo a2ensite dhis2trainingland.com.conf sudo systemctl restart apache2 sudo systemctl status apache2 SSL Setup: https://www.digitalocean.com/community/tutorials/how-to-secure-apache-with-let-s-encrypt-on-ubuntu-18-04
- Feel free to contact me:
Mohammad Julhas Sujan Email: julhaspustcse@gmail.com Skype: julhas08 Website: www.julhas.com
I have purchased a domain from ‘Exonhost’. I want to host it in Digital Ocean Droplet. Let’s follow the below steps:
Step-1: Login to your digital ocean account. A. go to Manage from left sidebar >> click on Networking: Enter a domain that you own below and start managing your DNS within your DigitalOcean account.B. Click on the manage section from right side of your newly created domain:
C. Add the below record:
D. Copy the DNS and use it in the step-2:
Step-2: Now login in your domain panel:
A.	Copy the DNS from your hosting and add as below:
Step-3: Open your terminal and login into your hosting server with root privilege.

A.	Go to sites-available directory using cd ‘/etc/apache2/sites-available’ command
Create a new file ‘touch 41-JULHAS.COM’ (I have added here 41 because in this hosting, we have 40 other sites)
B.	Now open this file and add the below code:
<-VirtualHost *:80>
       ServerAdmin webmaster@localhost
       ServerName www.julhas.com
       ServerAlias julhas.com
   DocumentRoot /var/www/html/ julhas.com /
     ErrorLog ${APACHE_LOG_DIR}/error-julhas.com.log
     <-Directory />
          Allowoverride All
          Require all granted
     <-/Directory>
      # Possible values include: debug, info, notice, warn, error, crit,
      # alert, emerg.
      LogLevel warn
       CustomLog ${APACHE_LOG_DIR}/access.log combined
<-/VirtualHost>

C.	Back from here and go  cd ‘sites-enabled’ directory
Type the below command: ln -s /etc/apache2/sites-available/41-JULHAS.COM 41-JULHAS.COM.conf
Step-04: Visit your root directory: /var/www/html
A.	Create a directory: julhas.com
B.	Upload all of your apps/software/website files
Step-05: Restart your server: `service apache2 restart`. Type your apps in browser and enjoy it!
Short way: sudo mkdir -p /var/www/dhis2trainingland.com sudo chown -R $root:$root /var/www/dhis2trainingland.com nano /var/www/dhis2trainingland.com/index.html sudo cp /etc/apache2/sites-available/000-default.conf /etc/apache2/sites-available/dhis2trainingland.com.conf sudo nano /etc/apache2/sites-available/dhis2trainingland.com.confServerAdmin admin@dhis2trainingland.com ServerName dhis2trainingland.com ServerAlias www.dhis2trainingland.com DocumentRoot /var/www/dhis2trainingland.com ErrorLog ${APACHE_LOG_DIR}/error.log CustomLog ${APACHE_LOG_DIR}/access.log combined RewriteEngine on RewriteCond %{SERVER_NAME} =www.dhis2trainingland.com [OR] RewriteCond %{SERVER_NAME} =dhis2trainingland.com RewriteRule ^ https://%{SERVER_NAME}%{REQUEST_URI} [END,NE,R=permanent] sudo a2ensite dhis2trainingland.com.conf sudo systemctl restart apache2 sudo systemctl status apache2 SSL Setup: https://www.digitalocean.com/community/tutorials/how-to-secure-apache-with-let-s-encrypt-on-ubuntu-18-04
- Feel free to contact me:
Mohammad Julhas Sujan Email: julhaspustcse@gmail.com Skype: julhas08 Website: www.julhas.com